Prerequisites:
The Basics
Overview:
A few people have asked how to do "visible" light beams as seen in
a few custom maps built with UnrealEd. One approach is to simply model
the beam as a brush and apply what is known as a "gradient" texture
to it in a way that will simulate a beam of light gradually fading out as it
gets further from the light source.
Creating the brush in the shape you want is probably the trickiest part. I kind of cheat and use Lightwave to create the shape, export the model as a .DXF file, then import it as a brush in UnrealEd. If you'd like an example brush to get started, I've provided the .DXF file I used in this example. I've also provided a sample gradient texture for a yellow beam.
Download:
Example light beam .DXF model (2K)
Example light beam texture (3K)
First you'll need to build the brush. Use UnrealEd creatively or use an external 3D package to build a solid brush in the shape of your light beam and place it into position. For this example, you can import the above .DXF file as a brush by selecting Import off of the Brush menu in UnrealEd. Rotate and move it into position and hit Add Brush to World.
The green wireframe in this picture is what the example light beam looks like:
Since a light beam is not a solid object, you'll want to make the brush into a Non-solid brush. Not only will that allow a player to walk through the beam, I assume that non-solid brushes are more efficient, since there's no collision detection to calculate.
Right-click on your brush and select Solidity -> Make Nonsolid. The brush will turn from blue to green in the editor.

To get the effect we're looking for, we'll use what's called a gradient texture. That just refers to a texture that smoothly changes from one color to another. If you have access to Photoshop, there's a handy gradient tool for doing just that. Since the texture will be repeating horizontally, there's no need to make it very wide. I would recommend making the texture 128 pixels high (or higher) to get the smoothest transition. Make one of the colors black and the other the color you want your beam to be, such as white or yellow. After you've done Step 4, the completely black parts of the texture will cause the brush surface to be transparent and the in-between colors will be translucent.
To get you started, I've provided an example yellow-to-black .PCX file (see link at the top of the page). It looks like this:
![]()
You will have to either add your texture to a .UTX texture package or import it into a .U package. See How to add custom textures for details on how to do that.
Once your texture is imported and available in the UnrealEd texture browser, apply the texture to your brush. If you're using the example brush, you'll need to use the Align Selected -> Align Wall Direction option and scale the texture so that the texture is scaled as small as possible without repeating vertically. I used a scaling factor of 0.6 for this example. Make sure the yellow end is up and the black end is down.
Now select all of the brush surfaces and set them to Unlit and Translucent. Unlit will make the beam "light up" like you'd expect and Translucent will make the darker areas of the texture more transparent. Black will be completely transparent.
You can also experiment with setting the surfaces to "2-Sided". That will make the beam a bit more three dimensional, allow the player to still see it while standing inside of it, and make it appear brighter. With the texture I used here, I thought that made it a little too bright, so I left the surfaces 1-sided.

NOTE: If your brush shape has surfaces at both ends or any surfaces you don't want to show up, be sure to set them to Invisible.
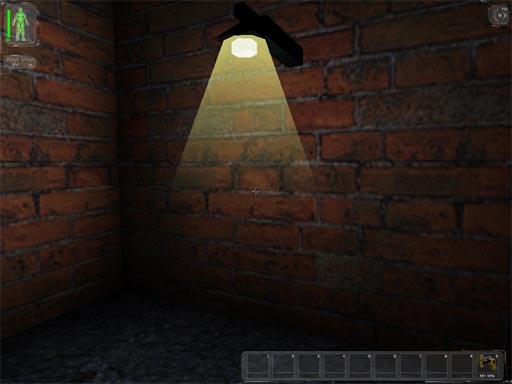
That's about it. Here's how my light beam example turned out in a little test map: